备注:删除这token,登陆流程就没问题了
咱们现在使用的 Guard 版本是什么~,使用的登录方式是什么呢~
我现在按照截图来看 咱们使用的是 AuthingGuard 这个组件吧~ 目前我们 一直在迭代更新的是 Guard 组件,并且 Guard 组件已经废弃主动将 token、user 写到 LocalStorage 中,看一下咱们的组件可以进行替换吗?如果不行的话 遇到的问题可以继续反馈~
方便发一下 目前项目中这部分的代码吗?我现在只能判断是 咱们的引用有些问题~ 如果有完整的示例代码我这里更好判断一些~
登陆页面代码
import React from 'react';
import { history, useModel } from 'umi';

import styles from './index.less';
import SelectDomain from '@/components/SelectDomain';
// import useRequest from '@ahooksjs/use-request';

import { AuthingGuard } from '@authing/react-ui-components';
// 引入 css 文件
import '@authing/react-ui-components/lib/index.min.css';


const Login: React.FC = () => {
  const { initialState, setInitialState } = useModel('@@initialState');

  const fetchUserInfo = async () => {
    const userInfo = await initialState?.fetchUserInfo?.();
    if (userInfo) {
      await setInitialState((s) => ({
        ...s,
        currentUser: userInfo,
      }));
    }
  };


  return (
    <div className={styles.container}>
      <div className={styles.lang} data-lang>
        <div style={{ display: 'block', float: 'right' }}>
          <SelectDomain />
        </div>
      </div>
      <AuthingGuard
        appId="xxxxx"
        onLogin={async (userinfo) => {
          // console.log(userinfo);
          await fetchUserInfo();
          /** 此方法会跳转到 redirect 参数所在的位置 */
          if (!history) return;
          const { query } = history.location;
          const { redirect } = query as { redirect: string };
          history.push(redirect || '/');
        }}
      />
    </div>
  );
};

export default Login;
登陆成功后读取用户信息。fetchUserInfo
import type { Settings as LayoutSettings } from '@ant-design/pro-layout';
import type { RunTimeLayoutConfig, RequestConfig } from 'umi';
import { history, Link } from 'umi';
import RightContent from '@/components/RightContent';

import { BookOutlined, LinkOutlined } from '@ant-design/icons';
import { debug as createDebug } from 'debug';
import { initAuthClient, useAuthing } from '@authing/react-ui-components';


initAuthClient({
  appId: 'xxxxx',
});
const { authClient } = useAuthing();
globalThis.d = createDebug('debug');
// global.debug = d('default');

const isDev = process.env.NODE_ENV === 'development';
const loginPath = '/user/login';
let token: Maybe<string> | undefined;

/** 获取用户信息比较慢的时候会展示一个 loading */
export const initialStateConfig = {
  // loading: <Spin />,
};

/**
 * @see  https://umijs.org/zh-CN/plugins/plugin-initial-state
 * */
export async function getInitialState(): Promise<{
  settings?: Partial<LayoutSettings>;
  currentUser?: API.CurrentUser;
  fetchUserInfo?: () => Promise<API.CurrentUser | undefined>;
}> {
  const fetchUserInfo = async () => {
    let r = await authClient?.getCurrentUser();
    // debugger
    if (r) {
      token = r.token;
      return {
        name: r.username,
        avatar: r.photo,
      } as API.CurrentUser;
    }
    return undefined;

  };
  // 如果是登录页面,不执行
  if (history.location.pathname !== loginPath) {
    const currentUser = await fetchUserInfo();
    return {
      fetchUserInfo,
      currentUser,
      settings: {},
    };
  }
  return {
    fetchUserInfo,
    settings: {},
  };
}

// ProLayout 支持的api https://procomponents.ant.design/components/layout
export const layout: RunTimeLayoutConfig = ({ initialState }) => {
  return {
    rightContentRender: () => <RightContent />,
    disableContentMargin: false,
    // waterMarkProps: {
    //   content: initialState?.currentUser?.name,
    // },
    // footerRender: () => <Footer />,
    onPageChange: () => {
      const { location } = history;
      // 如果没有登录,重定向到 login
      if (!initialState?.currentUser && location.pathname !== loginPath) {
        history.push(loginPath);
      }
    },
    links: isDev
      ? [
          <Link to="/umi/plugin/openapi" target="_blank">
            <LinkOutlined />
            <span>OpenAPI 文档</span>
          </Link>,
          <Link to="/~docs">
            <BookOutlined />
            <span>业务组件文档</span>
          </Link>,
        ]
      : [],
    menuHeaderRender: undefined,
    // 自定义 403 页面
    // unAccessible: <div>unAccessible</div>,
    ...initialState?.settings,
  };
};
export const request: RequestConfig = {
  errorConfig: {
    adaptor: (resData) => {
      // debugger
      return {
        ...resData,
        success: resData.success,
        errorMessage: resData.message,
        showType: 4,
      };
    },
  },
  credentials: 'include',
  requestInterceptors: [
    (url, options) => {

      const requestDomain = localStorage.getItem('requestDomain') || '';
      let u = url;
      let h = options.headers as HeadersInit;
      h['Authorization'] = `Bearer ${token}`;

      if (!u.startsWith('http')) {
        if (requestDomain) {
          u = requestDomain + url;
        }
      }

      return {
        // 修改请求路径
        url: u,
        options: {
          ...options,
        },
      };
    },
  ],
};
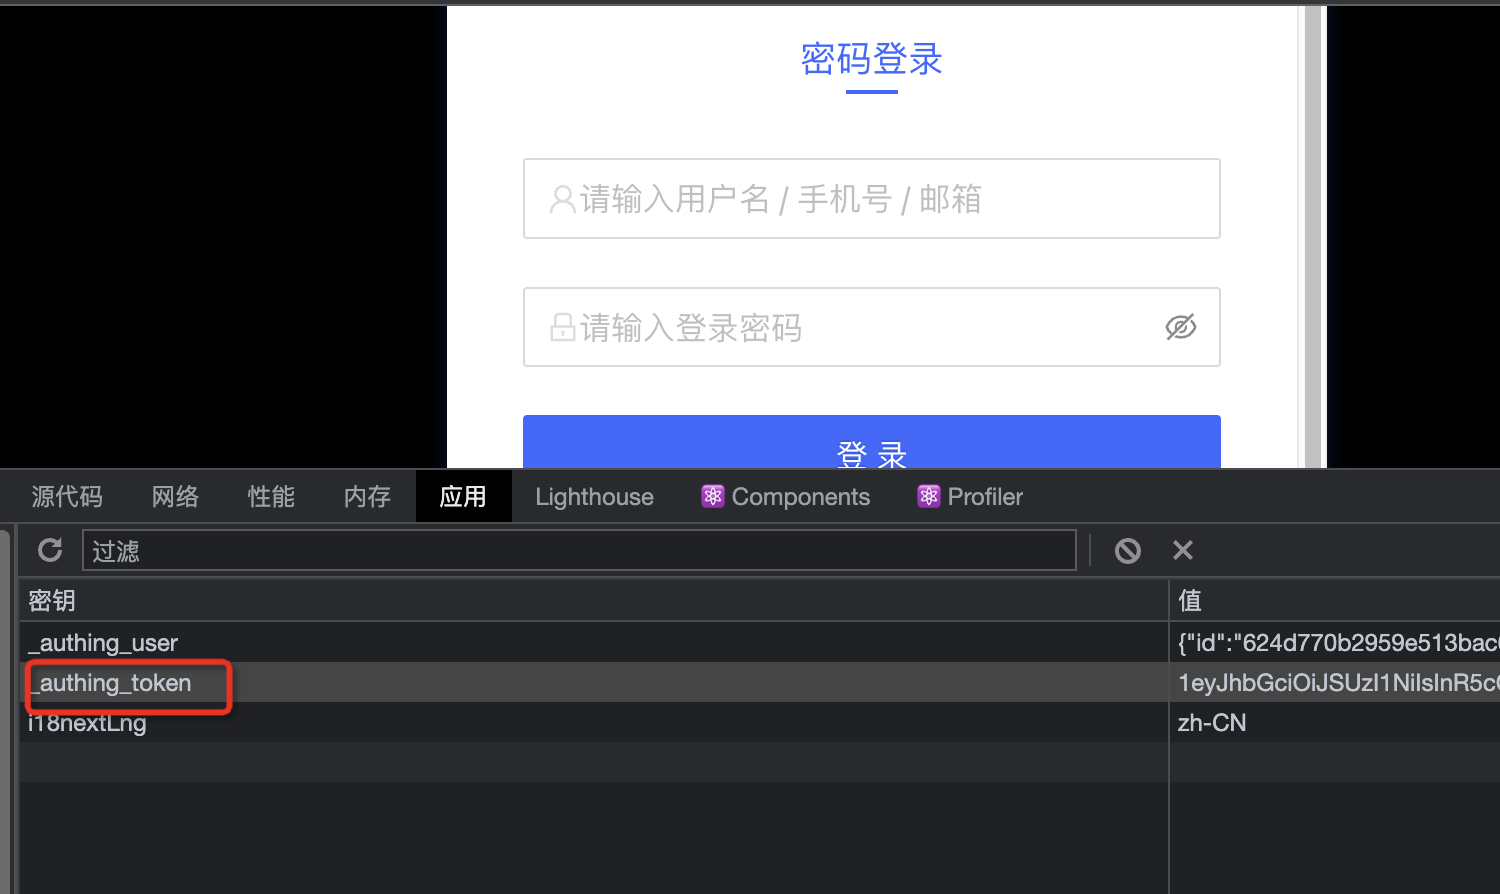
其实问题很简单。就是我看network的时候,登陆请求,是已经显示登陆成功了。
然后在获取用户信息,返回了当前状态是未登陆,看了下network的cookie,授权的token是老的,没有用到登陆成功后的token。所以说到底就是token的本地缓存没更新成功。下面我提供下截图,我把本地token改成一个错误的,前面加了个“1”。如果有其他的sdk包,可以提供下,我这边切换也方便

主要是咱们的使用方式有些问题,拆分为三个问题
- 老版本 Guard 替换成新版本 Guard
新版本中的 Guard 组件已经废弃主动将 token、user 写到 LocalStorage 中,需要使用者手动进行维护。
import { AuthingGuard } from '@authing/react-ui-components';
将这部分引用替换为 Guard 即可,Props 传值的方式不用变化
import { Guard } from '@authing/react-ui-components';
-
AuthClient 的使用
代码中咱们直接使用的是 initAuthClient,按照您提供的业务场景中并不推荐这样使用,如果想使用 AuthClient 可以直接初始化 SDK,或者可以使用 onLogin 回调返回的 AuthClient。直接使用 useAuthing + initAuthClient 的话回导致 SDK 内部状态不一致,导致一些不可控的错误。 -
Token 有效性校验问题
在获取当前用户时,应该优先判断 Token 是否被篡改,检查的方法为 checkLoginStatus 以及 Token 相关文档
我还有个疑问。你这里说新的Guard,不再维护本地token,那么是不是说,用户每次打开页面,登陆状态都会被重置,需要重新登陆才能后续操作了。AuthClient需要通过onLogin来获取。
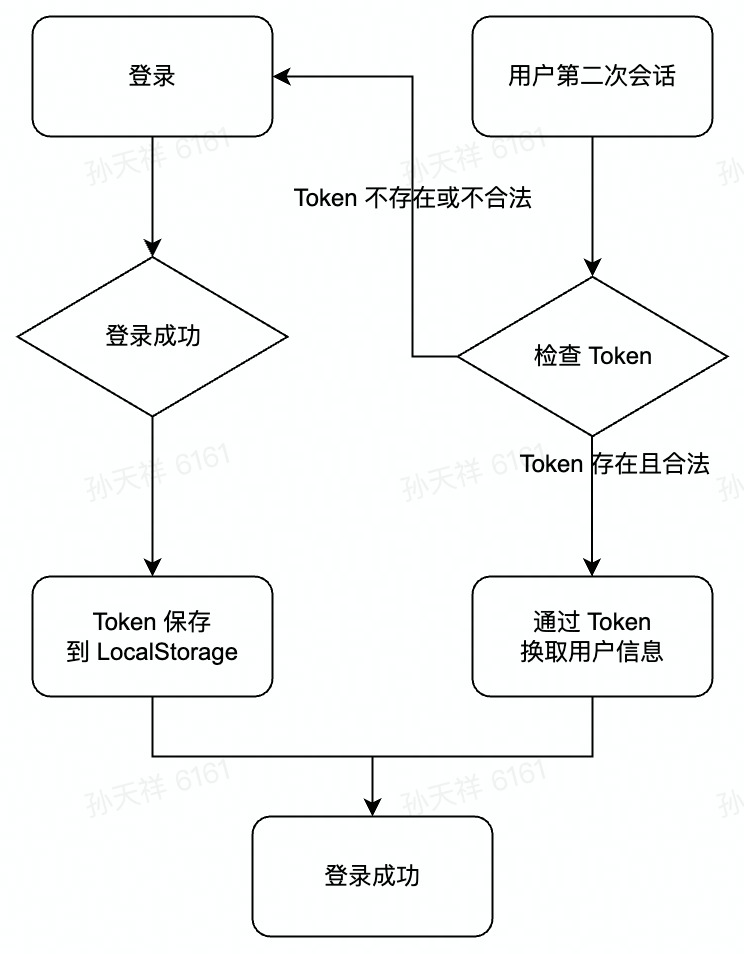
- 在 onLogin 的回调中会返回 user 对象,user 对象中有 Token 属性,咱们可以手动保存在 LocalStorage 中或者其他的地方,不用再依赖 Guard 的保存了
- 在 onLogin 中获取 AuthClient 只是其中的一个方法,咱们可以直接使用 SDK 初始化 AuthClient。
- 通过 Token 可以获取到用户的详情信息的,我们的 SDK 中提供了方法 getCurrentUser,具体的使用方式可以看一下这个方法的文档。
我简单的画了一下 业务流程图 可以参考一下